Latest Entries »

Establishing network connection between linux (on VM) and windows 

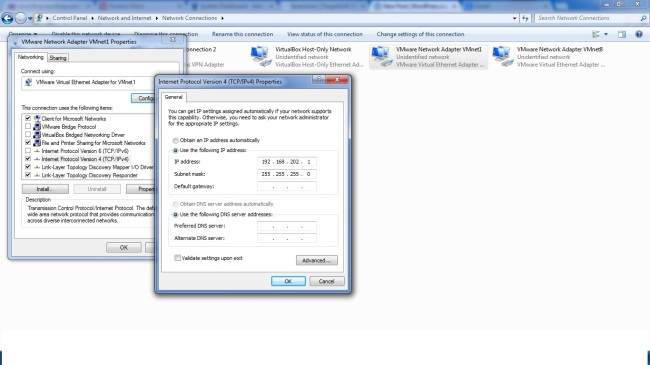
By default installation of VM Ware Workstation you will get 1 or more network adapters on your network and sharing center , in my case 2 are been created with installation.

Image

Image

Configure those two network adapters manually  with ip address(ipv4) with “192.168.20.1” and “192.168.202.3″  and with default subnetmask value “255.255.255.0”

Above IP address that i given in vmware network adapters are can be anything (192.168.***.***), 192.168 are must be same and rest is your wish.

Below is my network preference in VM Ware for linux operating system that i am going to configure below.

13

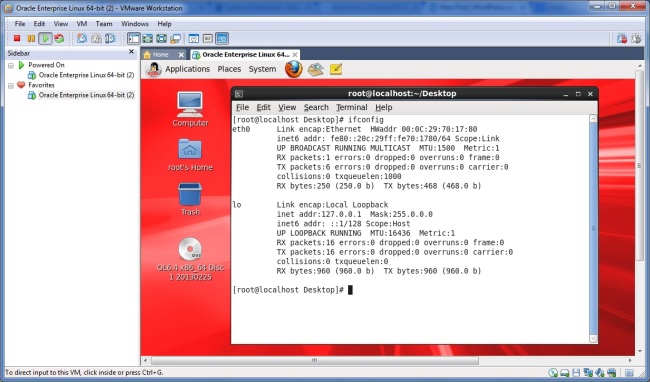
Open VM Ware workstation and power on the Linux operating system.

And then next open a terminal.

Image

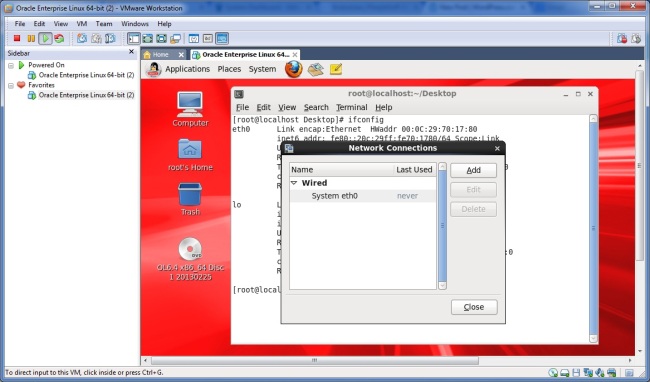
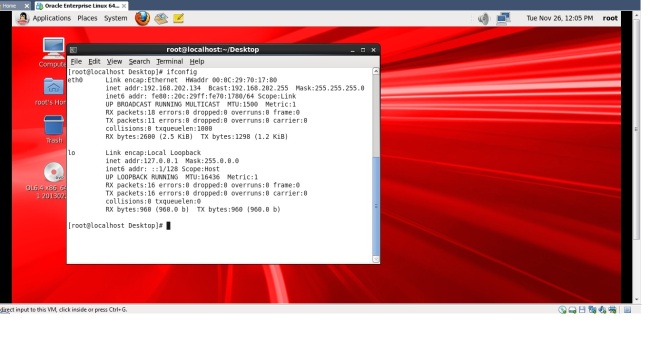
Execute command “ifconfig” from your terminal as a root user to get the network  adapters and its corresponding ip address.

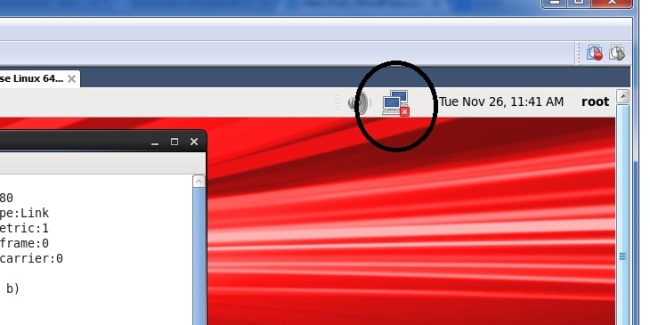
If no network is established between Linux(guest) to windows(host operating system) you see on network icon with cross mark with status “no network connection

Image

Image

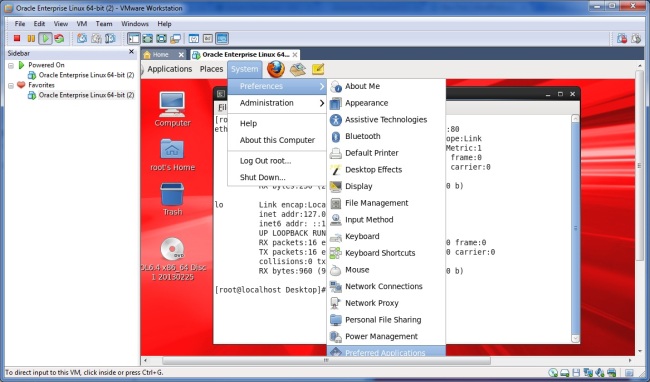
select System –>Preferences –> network connections

Image

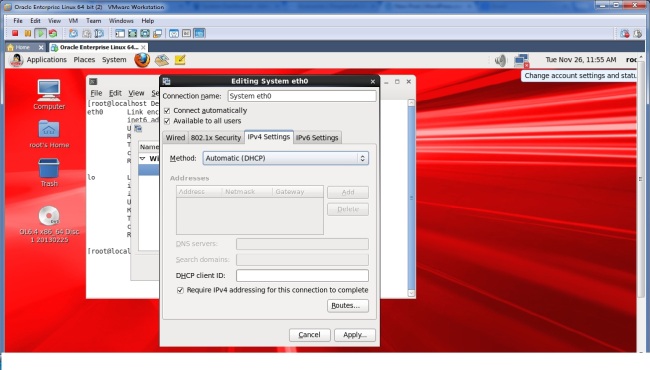
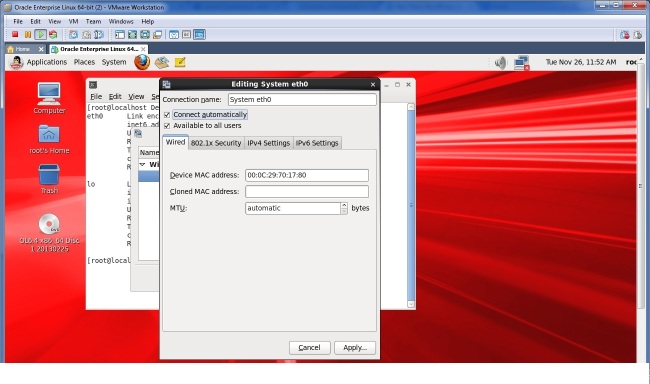
select “System eth0”  and select edit button.Image

Make sure connect automatically and available to all users are checked from wired tab.

Image

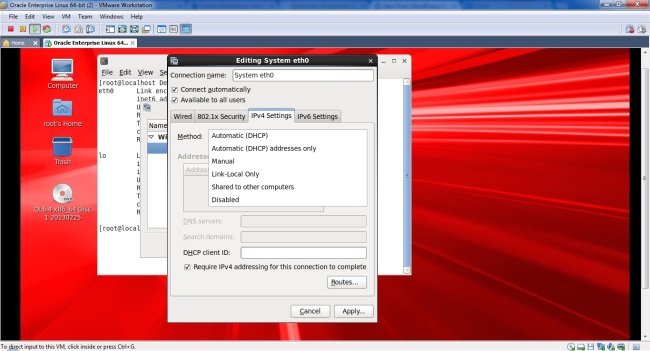
Next select Ipv4 settings tab.

Image

select Automatic(DHCP) address only from drop down list.

And then next select apply and close. 

Image

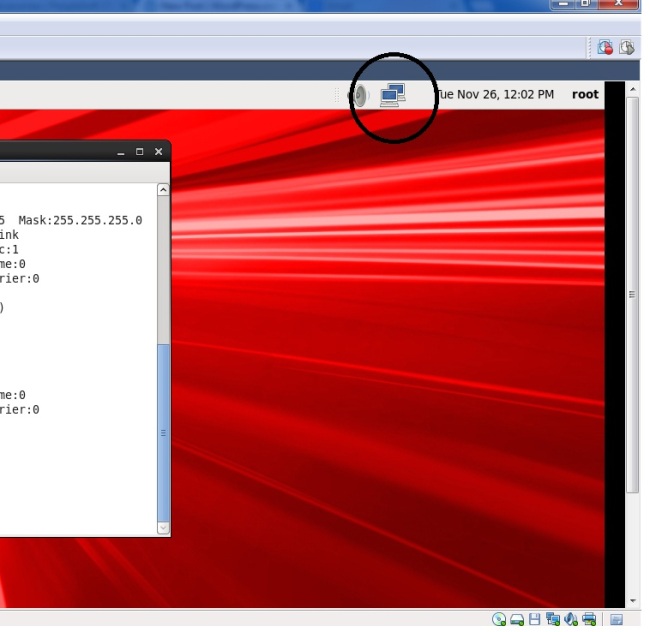
Now the network is established between guest and host operating system with no cross mark on network icon.

Image

execute “ifconfig” command in terminal to get the ip address of adapter eth0 that we configured in above steps.

Now you can connect from Linux(guest operating system) with above ip address to your Windows operating system(host).

NOTE : If you find an issue and not able to establish connection between guest and host operating system after going through below complete steps , just select “obtain ip address automatically” in your windows machine as shown below.

Image

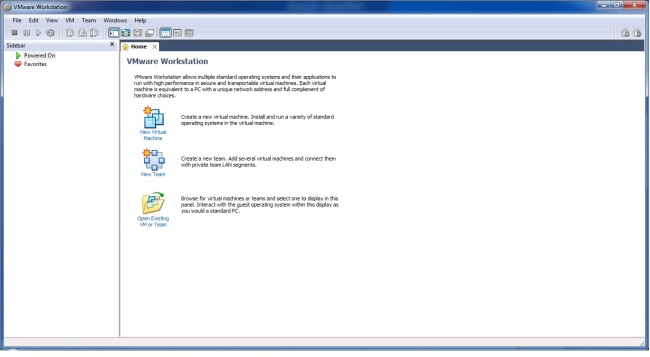
After Installing VMware Workstation(7.1.6) on your machine,Open VMware Workstation.

Image

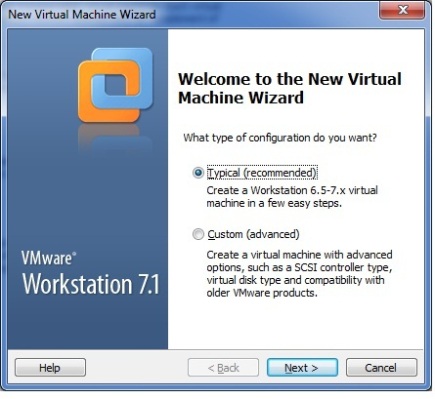
File –>New –>Virtual Machine

Image

Next.

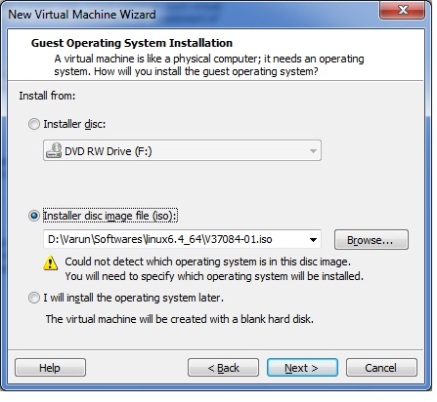
browse the installation file ( i am using iso file)

Image

Next.

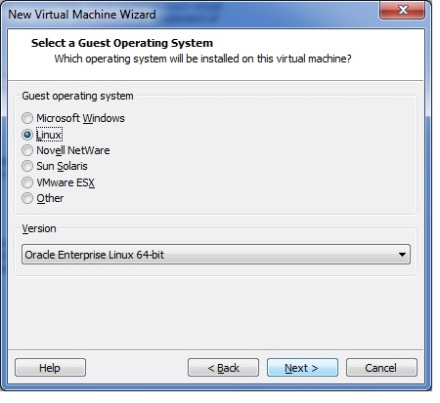
Choose the type of operation system that you are going to install in Vm.

Image

Next.

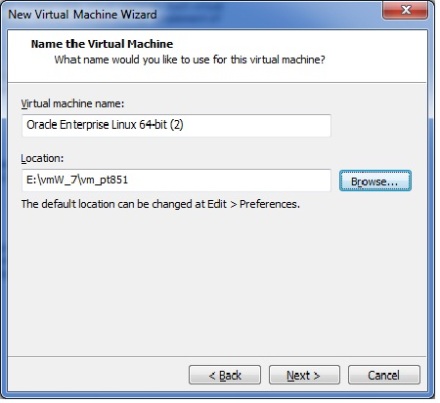
Specify the virtual machine name(you Wish) and select the location where to store the vm disk files.

Image

Next.

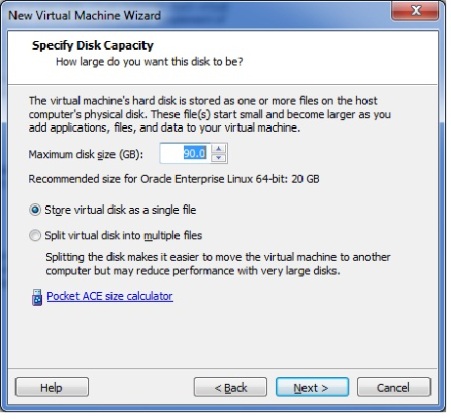
Allocate the space for the vm disk files, it can be increased later on.

Image

Next.

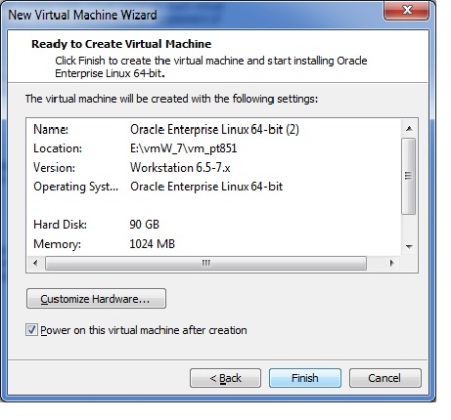
If you want to customize  select customize or select finish.

Image

Finish.

Image

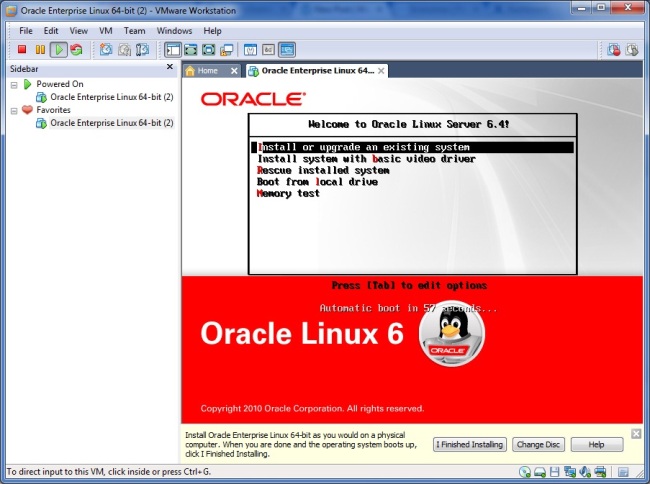
select Install or upgrade an existing system , and then press enter.

Note:- To get mouse courser out of VM Machine just do Ctrl+Alt.

Image

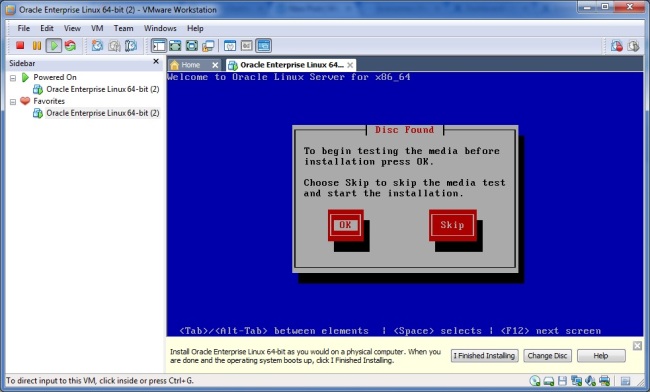
To make sure the installation files are good to install , select ok to check or else just select Skip.

Image

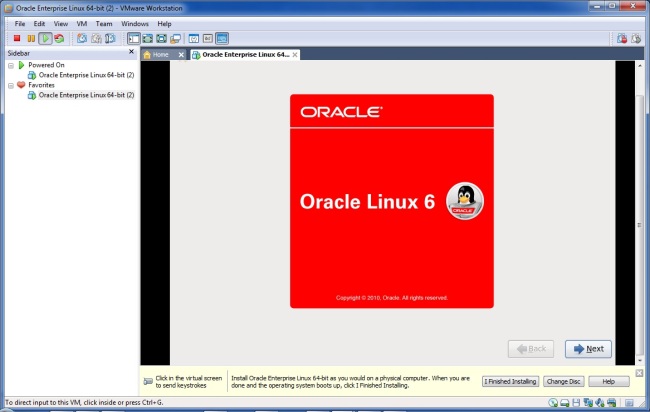
Next.

Image

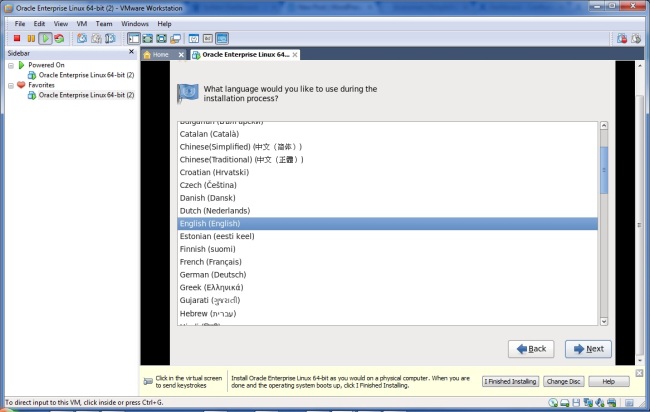
Choose the language , then Next.

Image

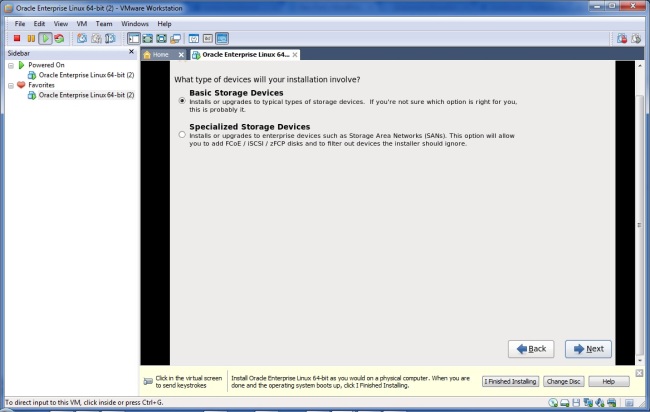
Select type of storage device, i prefer basic storage for my installation.Then Next.

Image

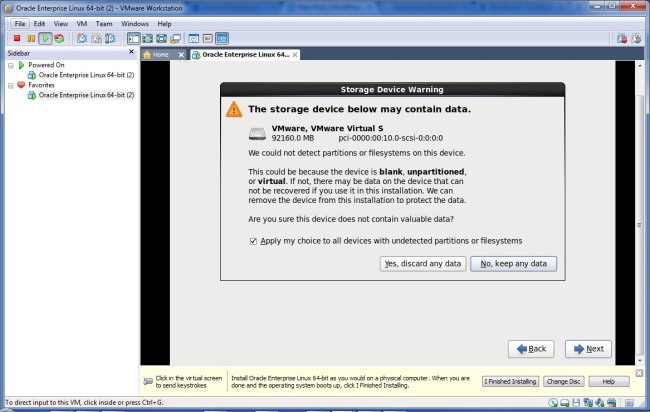
I choose Yes, discard any data option , since i want to make sure no data present in the vm disk file that i am going to install linux6.4. Then Next.

Image

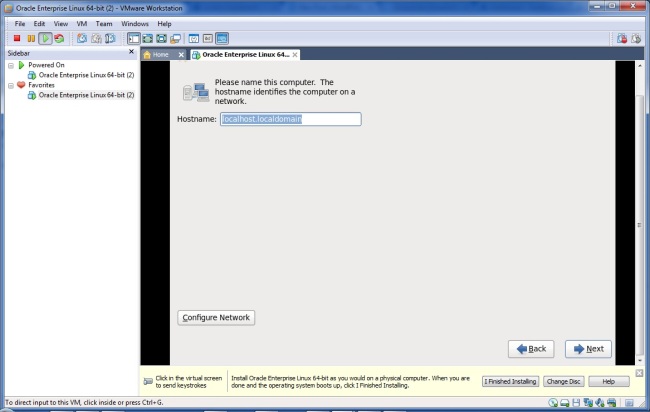
Enter the host name and then next.

Image

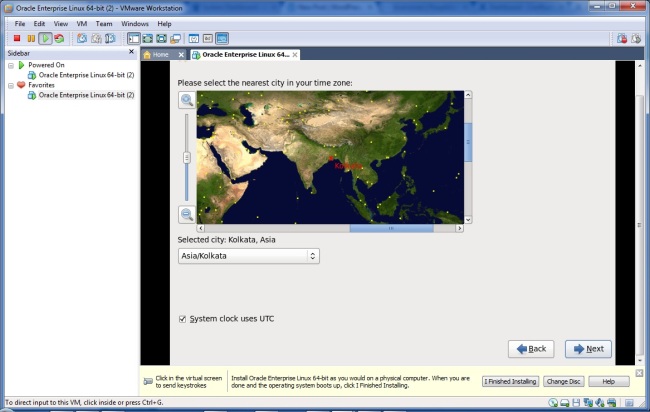
Set the time zone and then Next.

Image

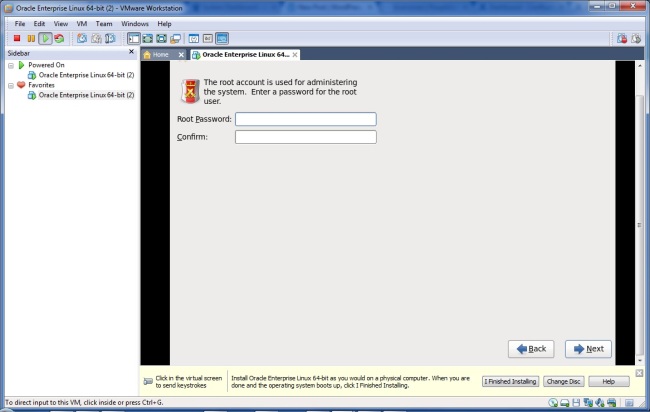
Enter the Root user password and then next.

Image

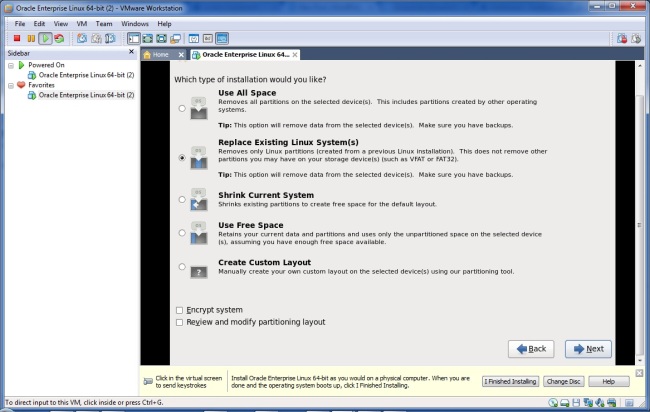
Go through the type of installation , i choose Replace existing linux operating system.  select Next.

Image

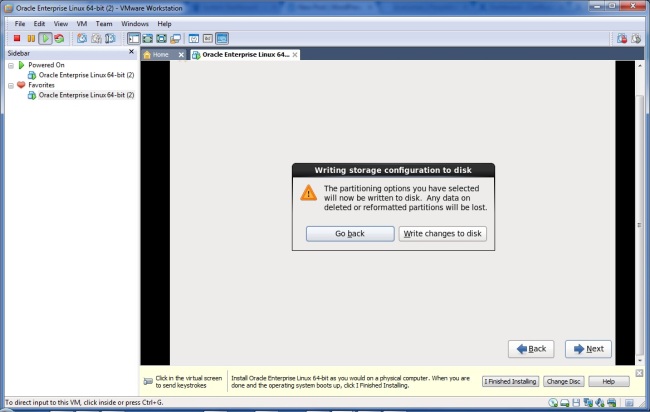
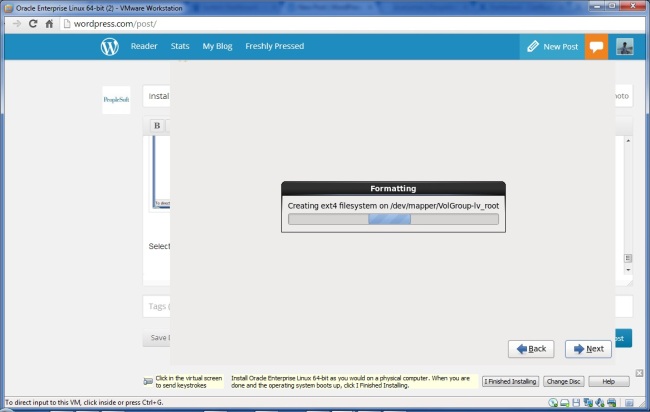
Select Write changes to disk button to save all the changes made above.

select Desktop from the list to get GUI, and you can install new tools or rpms by selecting  customize now radio button.

Image

Image

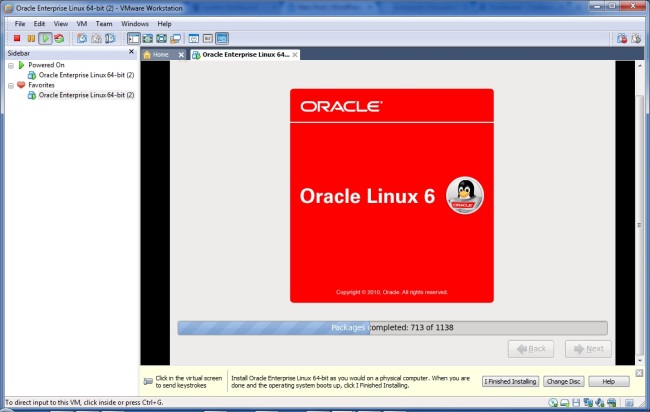
Click on “I Finished Installing” button to install vm tools  which makes the mouse courser to move freely in between guest and host operating systems.

Image

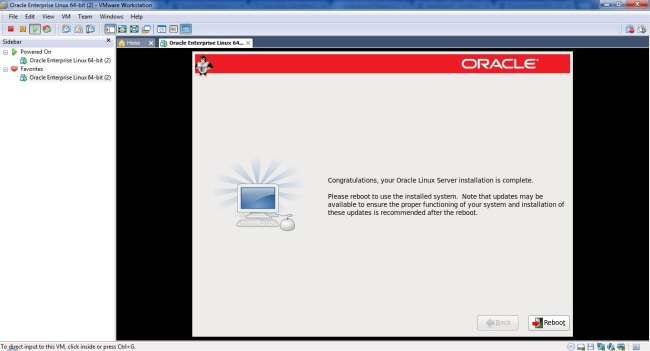
Select Reboot.

Image

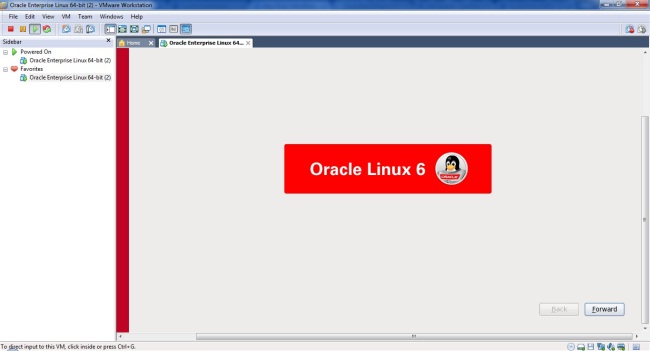
Select Forward.

Then in next window, select ” i accept the agreement ” then forward.

In next window , you can create another user or else select forward.

In next window , select time and date, then forward .

In next window select next and finish.

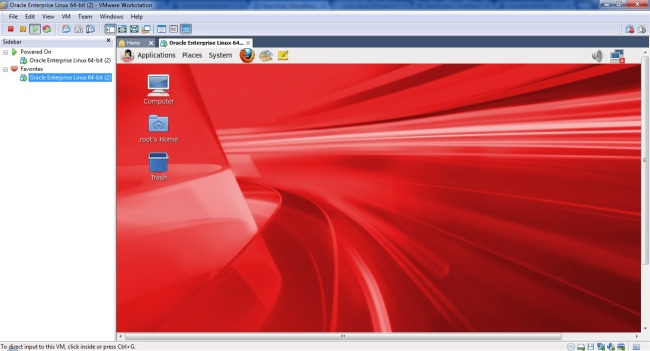
At last it reboots the linux operation system in VM , then next login screen appears , give root user and password.

Image

Installation is Done.

Yellowdog Update , Modifier(yum) i s an open-source command line package management utility for Linux operating systems.

Yum allows you to install RPMs very easily.

Before going through YUM you have to configure the repository In this present document  i am going to show how to configure repository using ISO file.

  • Mount the Linux installation cdrom  to /mnt

Ex:  [root@localhost ~]# mount /dev/cdrom /mnt/
mount: block device /dev/sr0 is write-protected, mounting read-only
[root@localhost ~]#

  • As a root user change directory to /etc/yum.repos.d/ . create a file with the name as you wish and should be with the extension .repo  and write the code as below in the file that you created.

Ex: [root@localhost yum.repos.d]# touch varun.repo

[root@localhost yum.repos.d]# vi varun.repo

[varun]

name=varun

baseurl=file:///mnt

# NOTE: if you are working with Linux 5.* then above baseurl=file://mnt/server

gpgcheck=0

enabled=1

Save the file.

  • Edit public-yum-ol6.repo file from /etc/yum.repo.d/ location. Ensure  “enabled=0” is set in the public-yum-ol6.repo file, if  enabled is set to 1 make it to 0 using text editer.
  • List all rpms in repository with below command.

[root@localhost media]# yum list all


  • Now you can install with yum utility as shown below.

Ex:    [root@localhost ~]# yum install gcc*

Loaded plugins: refresh-packagekit, security

Setting up Install Process


1. Create default tablespace to rman utility user (OPTIONAL)

sqlplus / as sysdba

SQL*Plus: Release 11.2.0.2.0 Production on Wed Oct 24 02:51:36 2012

Copyright (c) 1982, 2010, Oracle.  All rights reserved.

Connected to:
Oracle Database 11g Enterprise Edition Release 11.2.0.2.0 – 64bit Production
With the Partitioning, OLAP, Data Mining and Real Application Testing options

SQL>create tablespace varun datafile ‘/o001/app/oracle/PSDMO7/varun.dbf’ size 250m;

Tablespace created.

2.creating RMAN utility user in database to store backup info.

SQL> create user varun identified by varun default tablespace varun quota unlimited on varun;

User created.

SQL> grant recovery_catalog_owner to varun;

Grant succeeded.
SQL> exit

3. Creating CATALOG database

$ rman catalog varun/varun

Recovery Manager: Release 11.2.0.2.0 – Production on Wed Oct 24 03:25:46 2012

Copyright (c) 1982, 2009, Oracle and/or its affiliates.  All rights reserved.

connected to recovery catalog database

RMAN> create catalog;

recovery catalog created

RMAN>

4. Registering Target Database under catalog database

$rman target kumar/kumar@PSDMO8 catalog varun/varun

Recovery Manager: Release 11.2.0.2.0 – Production on Wed Oct 24 03:36:18 2012

Copyright (c) 1982, 2009, Oracle and/or its affiliates.  All rights reserved.

connected to target database: PSDMO8 (DBID=3631729544)
connected to recovery catalog database

RMAN> register database;

database registered in recovery catalog
starting full resync of recovery catalog
full resync complete

RMAN>

NOTE:If you see any issues related to privileges while registering database, you can grant sysdba privilege to rman utility user on target database  ” grant sysdba to varun” after creating catalog database. Granting sysdba to rman utility user is not recommended.

1. Starting PUBSUB Server Process with TMADMIN utility

–>PSADMIN

—> 1) Application Server

–>1) Administer a domain

–>1) ABCD  (” Choose the domain that you are going to start PUBSUB”)

–>5) TUXEDO command line (tmadmin)

> boot -g PUBSUB
INFO: Oracle Tuxedo, Version 10.3.0.0, 64-bit, Patch Level 067

Booting server processes …

exec PSBRKHND -o ./LOGS/stdout -e ./LOGS/stderr -s PSBRKHND_dflt:BrkProcess — -D PSDMO7 -S PSBRKHND_dflt :
CMDTUX_CAT:821: INFO: Duplicate server.
exec PSBRKDSP -o ./LOGS/stdout -e ./LOGS/stderr -s PSBRKDSP_dflt:Dispatch — -D PSDMO7 -S PSBRKDSP_dflt :
CMDTUX_CAT:821: INFO: Duplicate server.
exec PSPUBHND -o ./LOGS/stdout -e ./LOGS/stderr -s PSPUBHND_dflt:PubConProcess — -D PSDMO7 -S PSPUBHND_dflt :
CMDTUX_CAT:821: INFO: Duplicate server.
exec PSPUBDSP -o ./LOGS/stdout -e ./LOGS/stderr -s PSPUBDSP_dflt:Dispatch — -D PSDMO7 -S PSPUBDSP_dflt :
CMDTUX_CAT:821: INFO: Duplicate server.
exec PSSUBHND -o ./LOGS/stdout -e ./LOGS/stderr -s PSSUBHND_dflt:SubConProcess — -D PSDMO7 -S PSSUBHND_dflt :
CMDTUX_CAT:821: INFO: Duplicate server.
exec PSSUBDSP -o ./LOGS/stdout -e ./LOGS/stderr -s PSSUBDSP_dflt:Dispatch — -D PSDMO7 -S PSSUBDSP_dflt :
CMDTUX_CAT:821: INFO: Duplicate server.
0 processes started.

>

To exit  “q” .

This can be verified with server status

[psadmin1@fasurtech ~]$ psadmin -c sstatus -d ABCD
tmadmin – Copyright (c) 2007-2008 Oracle.
Portions * Copyright 1986-1997 RSA Data Security, Inc.
All Rights Reserved.
Distributed under license by Oracle.
Tuxedo is a registered trademark.

> Prog Name      Queue Name  Grp Name      ID RqDone Load Done Current Service
———      ———-  ——–      — —— ——— —————
BBL            225002     *********+       0    105      5250 (  IDLE )
PSMONITORSRV   MONITOR     MONITOR        1      0         0 (  IDLE )
PSAPPSRV       APPQ        APPSRV         1     17       850 (  IDLE )
PSWATCHSRV     WATCH       WATCH          1      0         0 (  IDLE )
PSAPPSRV       APPQ        APPSRV         2     16       800 (  IDLE )
PSSUBDSP       SUBDQ_dflt  PUBSUB       300      0         0 (  IDLE )
PSSUBHND       SUBHQ_dflt  PUBSUB       301      0         0 (  IDLE )
WSL            00001.00020 BASE          20      0         0 (  IDLE )
PSBRKDSP       BRKDQ_dflt  PUBSUB       100      0         0 (  IDLE )
PSSAMSRV       SAMQ        APPSRV       100      0         0 (  IDLE )
PSBRKHND       BRKHQ_dflt  PUBSUB       101      0         0 (  IDLE )
JREPSVR        00094.00250 JREPGRP      250     10       500 (  IDLE )
PSPUBDSP       PUBDQ_dflt  PUBSUB       200      0         0 (  IDLE )
JSL            00095.00200 JSLGRP       200      0         0 (  IDLE )
PSPUBHND       PUBHQ_dflt  PUBSUB       201      0         0 (  IDLE )

PUBSUB Process has 6 server process:

Publication Broker:
PeopleSoft Broker Dispatcher (PSBRKDSP)

PeopleSoft Broker Handler (PSBRKHND)

 Publication Contractor :

PeopleSoft Publication Dispatcher (PSPUBDSP)

PeopleSoft Publication Handler (PSPUBHND)

Subscription Contractor:

PeopleSoft Subscription Dispatcher (PSSUBDSP)

PeopleSoft Subscription Handler (PSSUBHND)

2. Stopping PUBSUB Server Process with TMADMIN utility

–>PSADMIN

—> 1) Application Server

–>1) Administer a domain

–>1) ABCD  (” Choose the domain that you are going to start PUBSUB”)

–>5) TUXEDO command line (tmadmin)

shutdown -g PUBSUB

Shutting down server processes …

Server Id = 300 Group Id = PUBSUB Machine = *********.localdomain:      shutdown succeeded
Server Id = 301 Group Id = PUBSUB Machine = **********.localdomain:      shutdown succeeded
Server Id = 200 Group Id = PUBSUB Machine = *********.localdomain:      shutdown succeeded
Server Id = 201 Group Id = PUBSUB Machine = **********.localdomain:      shutdown succeeded
Server Id = 100 Group Id = PUBSUB Machine = *********.localdomain:      shutdown succeeded
Server Id = 101 Group Id = PUBSUB Machine = *********.localdomain:      shutdown succeeded
6 processes stopped.

Application Bundles:

Application bundles deliver urgent fixes, including critical fixes released since the previous bundle. Application Bundles are delivered only for PeopleSoft 8 releases and higher.

Applying Bundles with CA(Change Assistant)

Change Assistant automates most of the maintenance tasks.

PeopleSoft Environment Management Framework(EMF) make Change Assistant available, basically it has three components

1.PSEMAgent:

These Agents exists on your PeopleSoPSEMAgent/envmetadata/configft servers (ie Database Server, Batch Server,Application Server and Web Server) . The primary job is to crawl the disk’s for the PeopleSoft installations.

  •       PSEMAgent resides at $PS_HOME
  •      Configuration files will be at $PS_HOME/PSEMAgent/envmetadata/config
  •      Before you begin with Bundles , you need to configure the PSEMAgent. change directory to  $PS_HOME/PSEMAgent/envmetadata/config there will a file with name  configuration.properties.
  • Just take a backup before you make modifications.
  • Edit the configuration.properties file as shown below.

 #hubURL= this is the host and port the agents talk to
hubURL=http://<Webserver Hostname or IP>:<Http or Https port>/PSEMHUB/hub
agentport=5283

ex:      hubURL=http://192.168.1.35:8800/PSEMHUB/hub
agentport=5283
#Windows directories need to use the forward slash (‘/’) character. For multiple directories, use a ‘|’ character as separator
windowsdrivestocrawl=c:|d:
unixdrivestocrawl=%HOME%

ex:     #windowsdrivestocrawl=c:|d:
unixdrivestocrawl=/ps_new/peoplesofthome

Since my server’s are in Linux , i have commented the windowsdrivestocrawl=c:|d: , I
have specified my $PS_HOME in unixdrivestocrawl.

2. PSEM Hub:

PSEM Hub resides in Web Server , which gathers information sent by PSEMAgents.

  • Location of PSEM Hub $PS_HOME/webserv/<Domain>/applications/peoplesoft.
  • Configurations files $PS_HOME/webserv/<Domain>/applications/peoplesoft/PSEMHUB.war/envmetadata/config/
  • Just take a backup before you make modifications.
  • Edit the configuration.properties file as shown below.

#hubURL= this is the host and port the agents talk to
hubURL=http://%HUB_MACHINE_NAME%:%HUB_PORT%/PSEMHUB/hub
agentport=5283
HUB_MACHINE_NAME= Web Server Host name or IP

HUB_PORT = Http or Https port

ex :    hubURL=http://192.168.1.35:8800/PSEMHUB/hub
agentport=5283

#Windows directories need to use the forward slash (‘/’) character. For multiple directories, use a ‘|’ character as separator
windowsdrivestocrawl=c:|d:
unixdrivestocrawl=%HOME%

ex :         #windowsdrivestocrawl=c:|d:
unixdrivestocrawl=/ps_new/peoplesofthome

Since my server’s are in Linux , i have commented the windowsdrivestocrawl=c:|d: , I
have specified my $PS_HOME in unixdrivestocrawl.

3. PSEMViewer :

With PSEMViewer we can view the information in PSEM Hub and we can make a XML file to view.
Applying BUNDLES:

Start  the PSEMAgent on your Peoplesoft Server’s  from $PS_HOME/PSEMAgent with the StartAgent.sh shell script for Linux.

[psadmin1@varuntech PSEMAgent]$ ./StartAgent.sh
Sending pulse from ‘com.peoplesoft.emf.peer:id=4’
Adding attribute PSAppHome: —>/ps_new/peoplesofthome
null
Adding attribute PSAppHome: —>/ps_new/peoplesofthome
Sending pulse from ‘com.peoplesoft.emf.peer:id=4’

Open the Change Assistant and start the PSEMAgent in your File Server.\

Configure same as above for the Agent, make sure that the drives should be specified  where the peopletools and oracle cilent being installed.

configuring he CA:

Open CA—>Tools  –>  Options

locate PS_HOME,Staging and Output.

CA–>Tools –> Options–>Select Environment Management tab

Server Host= WebServer Host name or IP

Server Port = Http or Https port

There should be no loss if you ping.

Start the PSEMAgent in your File Server.

Open CA

Select Tools —> Apply Change Packages

Select your choice ( i prefer 1)  Next

select Apply with out Impact Analyzer , Next

select the Application Release , Next

Select the target environment , Next

Select your File Server, Next

Fill the credentials

Source the location of your bundles, Next

Note: Dont unzip the bundles

You should be able to see the selected bundle in the next .

Choose the method of executing database scripts , Next

select Validate Now to view  your connections (File Sever)

Select Begin Apply,

Now we are done with the Bundles, Please get back me if you have any Q.

  • With PSADMIN utility we can administer the application server domain.
  • Below log shows you to create a new application server domain and configuring.
  • Change Directory to $PS_HOME/appserv on your application server.
  • Run the psadmin utility

NOTE: Values in quick configure menu will differ for diffrent environment.

[varun@localhost PsMpPIAInstall]$ psadmin

PSADMIN — Tools Release: 8.52
Copyright (c) 1996, 2011, Oracle. All rights reserved.

——————————–
PeopleSoft Server Administration
——————————–

  Config Home:  /ps_new/peoplesofthome

  1) Application Server
  2) Process Scheduler
  3) Search Server
  4) Web (PIA) Server
  5) Switch Config Home
  6) Replicate Config Home
  q) Quit
Command to execute (1-6, q): 1
——————————————–
PeopleSoft Application Server Administration
——————————————–

  1) Administer a domain
  2) Create a domain
  3) Delete a domain
  4) Import domain configuration
  q) Quit

Command to execute (1-4, q) : 2
Please enter name of domain to create :VARUN
Configuration templates:

  1) large
  2) small
  3) developer
  4) medium

Select config template number: 2

Creating domain…
Copying application server configuration files…
Copying [/ps_new/peoplesofthome/appserv/small.cfx] to [/ps_new/peoplesofthome/appserv/VARUN/psappsrv.cfg]
Stripping Annotations…
Copying [/ps_new/peoplesofthome/appserv/small.cfx] to [/ps_new/peoplesofthome/appserv/VARUN/psappsrv.cfx]
Copying Jolt repository file…
Domain created.

Would you like to configure this domain now? (y/n) [y] :

———————————————-
Quick-configure menu — domain: VARUN
———————————————-
      Features                      Settings
     ==========                    ==========
  1) Pub/Sub Servers   : No    16) DBNAME     :[VARUN]
  2) Quick Server      : No    17) DBTYPE     :[ORACLE]
  3) Query Servers     : No    18) UserId     :[QEDMO]
  4) Jolt              : Yes   19) UserPswd   :[QEDMO]
  5) Jolt Relay        : No    20) DomainID   :[TESTSERV]
  6) WSL               : No    21) AddToPATH  :[.]
  7) PC Debugger       : No    22) ConnectID  :[people]
  8) Event Notification: Yes   23) ConnectPswd:[peop1e]
  9) MCF Servers       : No    24) ServerName :[]
 10) Perf Collator     : No    25) WSL Port   :[7000]
 11) Analytic Servers  : Yes   26) JSL Port   :[9000]
 12) Domains Gateway   : No    27) JRAD Port  :[9100]

      Actions
     =========
 13) Load config as shown
 14) Custom configuration
 15) Edit environment settings
  h) Help for this menu
  q) Return to previous menu

HINT: Enter 15 to edit DBNAME, then 13 to load

Enter selection (1-27, h, or q): 8
———————————————-
Quick-configure menu — domain: VARUN
———————————————-
      Features                      Settings
     ==========                    ==========
  1) Pub/Sub Servers   : No    16) DBNAME     :[VARUN]
  2) Quick Server      : No    17) DBTYPE     :[ORACLE]
  3) Query Servers     : No    18) UserId     :[QEDMO]
  4) Jolt              : Yes   19) UserPswd   :[QEDMO]
  5) Jolt Relay        : No    20) DomainID   :[TESTSERV]
  6) WSL               : No    21) AddToPATH  :[.]
  7) PC Debugger       : No    22) ConnectID  :[people]
  8) Event Notification: No    23) ConnectPswd:[peop1e]
  9) MCF Servers       : No    24) ServerName :[]
 10) Perf Collator     : No    25) WSL Port   :[7000]
 11) Analytic Servers  : Yes   26) JSL Port   :[9000]
 12) Domains Gateway   : No    27) JRAD Port  :[9100]

      Actions
     =========
 13) Load config as shown
 14) Custom configuration
 15) Edit environment settings
  h) Help for this menu
  q) Return to previous menu

Enter selection (1-27, h, or q): 11
———————————————-
Quick-configure menu — domain: VARUN
———————————————-
      Features                      Settings
     ==========                    ==========
  1) Pub/Sub Servers   : No    16) DBNAME     :[VARUN]
  2) Quick Server      : No    17) DBTYPE     :[ORACLE]
  3) Query Servers     : No    18) UserId     :[QEDMO]
  4) Jolt              : Yes   19) UserPswd   :[QEDMO]
  5) Jolt Relay        : No    20) DomainID   :[TESTSERV]
  6) WSL               : No    21) AddToPATH  :[.]
  7) PC Debugger       : No    22) ConnectID  :[people]
  8) Event Notification: No    23) ConnectPswd:[peop1e]
  9) MCF Servers       : No    24) ServerName :[]
 10) Perf Collator     : No    25) WSL Port   :[7000]
 11) Analytic Servers  : No    26) JSL Port   :[9000]
 12) Domains Gateway   : No    27) JRAD Port  :[9100]

      Actions
     =========
 13) Load config as shown
 14) Custom configuration
 15) Edit environment settings
  h) Help for this menu
  q) Return to previous menu

Enter selection (1-27, h, or q): 6
———————————————-
Quick-configure menu — domain: VARUN
———————————————-
      Features                      Settings
     ==========                    ==========
  1) Pub/Sub Servers   : No    16) DBNAME     :[VARUN]
  2) Quick Server      : No    17) DBTYPE     :[ORACLE]
  3) Query Servers     : No    18) UserId     :[QEDMO]
  4) Jolt              : Yes   19) UserPswd   :[QEDMO]
  5) Jolt Relay        : No    20) DomainID   :[TESTSERV]
  6) WSL               : Yes   21) AddToPATH  :[.]
  7) PC Debugger       : No    22) ConnectID  :[people]
  8) Event Notification: No    23) ConnectPswd:[peop1e]
  9) MCF Servers       : No    24) ServerName :[]
 10) Perf Collator     : No    25) WSL Port   :[7000]
 11) Analytic Servers  : No    26) JSL Port   :[9000]
 12) Domains Gateway   : No    27) JRAD Port  :[9100]

      Actions
     =========
 13) Load config as shown
 14) Custom configuration
 15) Edit environment settings
  h) Help for this menu
  q) Return to previous menu

Enter selection (1-27, h, or q): 16
Enter new setting for DBNAME [VARUN]:PSDMO8

———————————————-
Quick-configure menu — domain: VARUN
———————————————-
      Features                      Settings
     ==========                    ==========
  1) Pub/Sub Servers   : No    16) DBNAME     :[PSDMO8]
  2) Quick Server      : No    17) DBTYPE     :[ORACLE]
  3) Query Servers     : No    18) UserId     :[QEDMO]
  4) Jolt              : Yes   19) UserPswd   :[QEDMO]
  5) Jolt Relay        : No    20) DomainID   :[TESTSERV]
  6) WSL               : Yes   21) AddToPATH  :[.]
  7) PC Debugger       : No    22) ConnectID  :[people]
  8) Event Notification: No    23) ConnectPswd:[peop1e]
  9) MCF Servers       : No    24) ServerName :[]
 10) Perf Collator     : No    25) WSL Port   :[7000]
 11) Analytic Servers  : No    26) JSL Port   :[9000]
 12) Domains Gateway   : No    27) JRAD Port  :[9100]

      Actions
     =========
 13) Load config as shown
 14) Custom configuration
 15) Edit environment settings
  h) Help for this menu
  q) Return to previous menu

Enter selection (1-27, h, or q): 18
Enter new setting for UserId [QEDMO]:PS

———————————————-
Quick-configure menu — domain: VARUN
———————————————-
      Features                      Settings
     ==========                    ==========
  1) Pub/Sub Servers   : No    16) DBNAME     :[PSDMO8]
  2) Quick Server      : No    17) DBTYPE     :[ORACLE]
  3) Query Servers     : No    18) UserId     :[PS]
  4) Jolt              : Yes   19) UserPswd   :[QEDMO]
  5) Jolt Relay        : No    20) DomainID   :[TESTSERV]
  6) WSL               : Yes   21) AddToPATH  :[.]
  7) PC Debugger       : No    22) ConnectID  :[people]
  8) Event Notification: No    23) ConnectPswd:[peop1e]
  9) MCF Servers       : No    24) ServerName :[]
 10) Perf Collator     : No    25) WSL Port   :[7000]
 11) Analytic Servers  : No    26) JSL Port   :[9000]
 12) Domains Gateway   : No    27) JRAD Port  :[9100]

      Actions
     =========
 13) Load config as shown
 14) Custom configuration
 15) Edit environment settings
  h) Help for this menu
  q) Return to previous menu

Enter selection (1-27, h, or q): 19
Enter new setting for UserPswd [QEDMO]:PS

———————————————-
Quick-configure menu — domain: VARUN
———————————————-
      Features                      Settings
     ==========                    ==========
  1) Pub/Sub Servers   : No    16) DBNAME     :[PSDMO8]
  2) Quick Server      : No    17) DBTYPE     :[ORACLE]
  3) Query Servers     : No    18) UserId     :[PS]
  4) Jolt              : Yes   19) UserPswd   :[PS]
  5) Jolt Relay        : No    20) DomainID   :[TESTSERV]
  6) WSL               : Yes   21) AddToPATH  :[.]
  7) PC Debugger       : No    22) ConnectID  :[people]
  8) Event Notification: No    23) ConnectPswd:[peop1e]
  9) MCF Servers       : No    24) ServerName :[]
 10) Perf Collator     : No    25) WSL Port   :[7000]
 11) Analytic Servers  : No    26) JSL Port   :[9000]
 12) Domains Gateway   : No    27) JRAD Port  :[9100]

      Actions
     =========
 13) Load config as shown
 14) Custom configuration
 15) Edit environment settings
  h) Help for this menu
  q) Return to previous menu

Enter selection (1-27, h, or q): 22
Enter new setting for ConnectID [people]:PEOPLE

———————————————-
Quick-configure menu — domain: VARUN
———————————————-
      Features                      Settings
     ==========                    ==========
  1) Pub/Sub Servers   : No    16) DBNAME     :[PSDMO8]
  2) Quick Server      : No    17) DBTYPE     :[ORACLE]
  3) Query Servers     : No    18) UserId     :[PS]
  4) Jolt              : Yes   19) UserPswd   :[PS]
  5) Jolt Relay        : No    20) DomainID   :[TESTSERV]
  6) WSL               : Yes   21) AddToPATH  :[.]
  7) PC Debugger       : No    22) ConnectID  :[PEOPLE]
  8) Event Notification: No    23) ConnectPswd:[peop1e]
  9) MCF Servers       : No    24) ServerName :[]
 10) Perf Collator     : No    25) WSL Port   :[7000]
 11) Analytic Servers  : No    26) JSL Port   :[9000]
 12) Domains Gateway   : No    27) JRAD Port  :[9100]

      Actions
     =========
 13) Load config as shown
 14) Custom configuration
 15) Edit environment settings
  h) Help for this menu
  q) Return to previous menu

Enter selection (1-27, h, or q): 23
Enter new setting for ConnectPswd [peop1e]:PEOPLE

———————————————-
Quick-configure menu — domain: VARUN
———————————————-
      Features                      Settings
     ==========                    ==========
  1) Pub/Sub Servers   : No    16) DBNAME     :[PSDMO8]
  2) Quick Server      : No    17) DBTYPE     :[ORACLE]
  3) Query Servers     : No    18) UserId     :[PS]
  4) Jolt              : Yes   19) UserPswd   :[PS]
  5) Jolt Relay        : No    20) DomainID   :[TESTSERV]
  6) WSL               : Yes   21) AddToPATH  :[.]
  7) PC Debugger       : No    22) ConnectID  :[PEOPLE]
  8) Event Notification: No    23) ConnectPswd:[PEOPLE]
  9) MCF Servers       : No    24) ServerName :[]
 10) Perf Collator     : No    25) WSL Port   :[7000]
 11) Analytic Servers  : No    26) JSL Port   :[9000]
 12) Domains Gateway   : No    27) JRAD Port  :[9100]

      Actions
     =========
 13) Load config as shown
 14) Custom configuration
 15) Edit environment settings
  h) Help for this menu
  q) Return to previous menu

Enter selection (1-27, h, or q): 25
Enter new setting for WSL Port [7000]:7500

———————————————-
Quick-configure menu — domain: VARUN
———————————————-
      Features                      Settings
     ==========                    ==========
  1) Pub/Sub Servers   : No    16) DBNAME     :[PSDMO8]
  2) Quick Server      : No    17) DBTYPE     :[ORACLE]
  3) Query Servers     : No    18) UserId     :[PS]
  4) Jolt              : Yes   19) UserPswd   :[PS]
  5) Jolt Relay        : No    20) DomainID   :[TESTSERV]
  6) WSL               : Yes   21) AddToPATH  :[.]
  7) PC Debugger       : No    22) ConnectID  :[PEOPLE]
  8) Event Notification: No    23) ConnectPswd:[PEOPLE]
  9) MCF Servers       : No    24) ServerName :[]
 10) Perf Collator     : No    25) WSL Port   :[7500]
 11) Analytic Servers  : No    26) JSL Port   :[9000]
 12) Domains Gateway   : No    27) JRAD Port  :[9100]

      Actions
     =========
 13) Load config as shown
 14) Custom configuration
 15) Edit environment settings
  h) Help for this menu
  q) Return to previous menu

Enter selection (1-27, h, or q): 26
Enter new setting for JSL Port [9000]:9500

———————————————-
Quick-configure menu — domain: VARUN
———————————————-
      Features                      Settings
     ==========                    ==========
  1) Pub/Sub Servers   : No    16) DBNAME     :[PSDMO8]
  2) Quick Server      : No    17) DBTYPE     :[ORACLE]
  3) Query Servers     : No    18) UserId     :[PS]
  4) Jolt              : Yes   19) UserPswd   :[PS]
  5) Jolt Relay        : No    20) DomainID   :[TESTSERV]
  6) WSL               : Yes   21) AddToPATH  :[.]
  7) PC Debugger       : No    22) ConnectID  :[PEOPLE]
  8) Event Notification: No    23) ConnectPswd:[PEOPLE]
  9) MCF Servers       : No    24) ServerName :[]
 10) Perf Collator     : No    25) WSL Port   :[7500]
 11) Analytic Servers  : No    26) JSL Port   :[9500]
 12) Domains Gateway   : No    27) JRAD Port  :[9100]

      Actions
     =========
 13) Load config as shown
 14) Custom configuration
 15) Edit environment settings
  h) Help for this menu
  q) Return to previous menu

Enter selection (1-27, h, or q): 13
Performing load prechecks …
Loading validation table…
  setting DBName=PSDMO8
  setting DBType=ORACLE
  setting UserId=PS
  setting UserPswd=PS
  setting ConnectId=PEOPLE
  setting ConnectPswd=PEOPLE
  setting ServerName=
  setting Port=7500
  setting Port=9500
  setting Listener Port=9100
  setting Domain ID=TESTSERV
  setting Add to PATH=.
New CFG file written with modified Startup parameters

Log Directory entry not found in configuration file.
Setting Log Directory to the default… [PS_SERVDIR/LOGS]
Spawning disabled for server PSAPPSRV.
WARNING: PSSAMSRV is configured with Min instance set to 1. To avoid loss of service, configure Min instance to atleast 2.
Configuration file successfully created.
CFG setting changes completed
Loading configuration…
Domain configuration complete.
——————————–
PeopleSoft Domain Administration
——————————–
     Domain Name: VARUN

  1) Boot this domain
  2) Domain shutdown menu
  3) Domain status menu
  4) Configure this domain
  5) TUXEDO command line (tmadmin)
  6) Edit configuration/log files menu
  7) Messaging Server Administration menu
  8) Purge Cache
  9) Preload Cache
 10) Clean IPC resources of this domain
  q) Quit

Command to execute (1-10, q) : 1
——————————-
PeopleSoft Domain Boot Menu
——————————-
     Domain Name: VARUN

  1) Boot (Serial Boot)
  2) Parallel Boot
  q) Quit

Command to execute (1-2, q) [q]: 1

Archived a copy of the domain configuration to /ps_new/peoplesofthome/appserv/VARUN/Archive/psappsrv.cfg
Attempting to boot bulletin board…
tmadmin – Copyright (c) 2007-2008 Oracle.
Portions * Copyright 1986-1997 RSA Data Security, Inc.
All Rights Reserved.
Distributed under license by Oracle.
Tuxedo is a registered trademark.
No bulletin board exists. Entering boot mode.

> INFO: Oracle Tuxedo, Version 10.3.0.0, 64-bit, Patch Level 067

Booting admin processes …

exec BBL -A :
        process id=22279 … Started.
1 process started.
Attaching to active bulletin board.

> Attempting to boot …
INFO: Oracle Tuxedo, Version 10.3.0.0, 64-bit, Patch Level 067

Booting server processes …

exec PSWATCHSRV -o ./LOGS/stdout -e ./LOGS/stderr -A — -ID 51061 -D TESTSERV -S PSWATCHSRV :
        process id=22323 … Started.
exec PSAPPSRV -o ./LOGS/stdout -e ./LOGS/stderr -s@psappsrv.lst — -D TESTSERV -S PSAPPSRV :
        process id=22327 … Started.
exec PSAPPSRV -o ./LOGS/stdout -e ./LOGS/stderr -s@psappsrv.lst — -D TESTSERV -S PSAPPSRV :
        process id=22596 … Started.
exec PSSAMSRV -o ./LOGS/stdout -e ./LOGS/stderr -A — -D TESTSERV -S PSSAMSRV :
        process id=22612 … Started.
exec PSMONITORSRV -o ./LOGS/stdout -e ./LOGS/stderr -A — -ID 51061 -D TESTSERV -S PSMONITORSRV :
        process id=22625 … Started.
exec WSL -o ./LOGS/stdout -e ./LOGS/stderr -A — -n //varun.localdomain:7500 -z 0 -Z 0 -I 5 -T 60 -m 1 -M 3 -x 40 -c 5000 -p 7501 -P 7503 :
        process id=22639 … Started.
exec JSL -o ./LOGS/stdout -e ./LOGS/stderr -A — -n //varun.localdomain:9500 -m 5 -M 7 -I 5 -j ANY -x 40 -S 10 -c 1000000 -w JSH :
        process id=22641 … Started.
exec JREPSVR -o ./LOGS/stdout -e ./LOGS/stderr -A — -W -P /ps_new/peoplesofthome/appserv/VARUN/jrepository :
        process id=22647 … Started.
8 processes started.
——————————–
PeopleSoft Domain Administration
——————————–
     Domain Name: VARUN

  1) Boot this domain
  2) Domain shutdown menu
  3) Domain status menu
  4) Configure this domain
  5) TUXEDO command line (tmadmin)
  6) Edit configuration/log files menu
  7) Messaging Server Administration menu
  8) Purge Cache
  9) Preload Cache
 10) Clean IPC resources of this domain
  q) Quit

Command to execute (1-10, q) :

  • You can only deply Webserver  Domain only after installing PeopleSoft Peopletools and Webserver ( Oracle Weblogic or IBM WebSphere)  .
  • PeopleSoft PeopleTools 8.52 supports 64-bit Oracle WebLogic 10.3.4.
  • Change Directory  to $PS_HOME/setup/PsMpPIAInstall

[varun@localhost PsMpPIAInstall]$ ./setup.sh -tempdir /varun/peoplesoft/temp
Setting temporary directory /varun/peoplesoft/temp/IA.4585
Executing setup.linux   -DCOMP_NAME=localhost.localdomain -DPS_UMASK=0002
Preparing to install…
Extracting the installation resources from the installer archive…
Configuring the installer for this system’s environment…

Launching installer…

Preparing CONSOLE Mode Installation…

===============================================================================
PeopleSoft Internet Architecture                 (created with InstallAnywhere)
——————————————————————————-

===============================================================================

 Welcome to the InstallShield Wizard for PeopleSoft Internet Architecture.

Using the InstallShield Wizard you will install PeopleSoft Internet
Architecture on your computer.

Version: 8.52
Note: If installing onto a Oracle WebLogic Server, make sure to shutdown any
running web servers to avoid web server corruption.
Press 1 for Next, 3 to Cancel or 5 to Redisplay [1] :

 ===============================================================================

 Choose the directory where you wish to deploy PeopleSoft Pure Internet
Architecture :

# This is where you are going to deply the Webserver domain reffred as PIA_HOME

 Please specify a directory name or press Enter [/varun/peoplesoft]:

Press 1 for Next, 2 for Previous, 3 to Cancel or 5 to Redisplay [1] :

 ===============================================================================

 Choose the installation type that best suits your needs.

  ->1- Oracle WebLogic Server
    2- IBM WebSphere Server

To select an item enter its number, or 0 when you are finished [0] :

Press 1 for Next, 2 for Previous, 3 to Cancel or 5 to Redisplay [1] :

===============================================================================

   Select the web server root directory [/home/varun/oracle/Middleware]: /varun/weblogichome

# Enter the high leavel directory where the WebServer being installed.

Detected web server version : WebLogic 10.3.4

Press 1 for Next, 2 for Previous, 3 to Cancel or 5 to Redisplay [1] :

===============================================================================

Please enter the administrator login and password for WebLogic domain.
   Login ID [system]:

   Password [Passw0rd]:

   Re-type Password [Passw0rd]:

Press 1 for Next, 2 for Previous, 3 to Cancel or 5 to Redisplay [1] :

===============================================================================

 
  ->1- Create New WebLogic Domain
    2- Existing WebLogic Domain

To select an item enter its number, or 0 when you are finished [0] :

Press 1 for Next, 2 for Previous, 3 to Cancel or 5 to Redisplay [1] : 1

===============================================================================

   Enter domain name or click Next to select default [peoplesoft]:

Press 1 for Next, 2 for Previous, 3 to Cancel or 5 to Redisplay [1] :

===============================================================================

 
Please select the configuration to install.

  ->1- Single Server Domain
    2- Multi Server Domain
    3- Distributed Managed Server

To select an item enter its number, or 0 when you are finished [0] :

Press 1 for Next, 2 for Previous, 3 to Cancel or 5 to Redisplay [1] :

===============================================================================

Please specify a name for the PeopleSoft web site:
   Website name [ps]:

Press 1 for Next, 2 for Previous, 3 to Cancel or 5 to Redisplay [1] :

 ===============================================================================

 Enter port numbers and summaries.

   AppServer name [localhost]:

   JSL Port [9000]:

   HTTP Port [80]:

   HTTPS Port [443]:

   Authentication Token Domain:(optional) []:

Press 1 for Next, 2 for Previous, 3 to Cancel or 5 to Redisplay [1] :

 #Make sure that you have configured the same JSL port in the application server, The HTTP and HTTPS ports should be open and it should not conflict with any other services.

===============================================================================

Please enter the Name of the Web Profile used to configure the webserver. The
user id and password will be used to retrieve the web profile from the
database. (NOTE: Other available preset web profile names are TEST”, “DEV”,and
“KIOSK”.)
   Web Profile Name [PROD]:

   User ID [PTWEBSERVER]:

   Password [PTWEBSERVER]:

   Re-type Password [PTWEBSERVER]:

Press 1 for Next, 2 for Previous, 3 to Cancel or 5 to Redisplay [1] :

 #select the webprofile and userid and password

===============================================================================

Select the Report Repository location:
   Please specify a directory name or press Enter [/home/varun/PeopleSoft
   Internet Architecture/psreports]: /varun/peoplesoft/psreports

Press 1 for Next, 2 for Previous, 3 to Cancel or 5 to Redisplay [1] :

===============================================================================

Setup Type : weblogic

Web server root directory : /varun/weblogichome

Web server version : 10.3

Web server domain : peoplesoft

Internet Architecture app name : PORTAL

Integration Gateway app name : PSIGW

PeopleSoft Business Interlink app name : PSINTERLINKS

PeopleSoft Online Library Infrastructure : PSOL

Environment Management Hub : PSEMHUB

Hello Portlet app name : helloportletapp

Portlet Container app name : pspc

Testsuite app name : testsuite

Wsrptest app name : wsrptest

Site name : ps

Authentication Token Domain :

Application server name : localhost

JSL port : 9000

HTTP port : 80

HTTPS port : 443

Report repository directory : /varun/peoplesoft/psreports

PIA webserver directory : /varun/peoplesoft/webserv

Press 1 for Next, 2 for Previous, 3 to Cancel or 5 to Redisplay [1] :

===============================================================================
Installing…
————-

 [==================|==================|==================|==================]
 [——————|——————|——————|——————]

===============================================================================
Installation Complete
———————

Congratulations! PeopleSoft Internet Architecture has been successfully
installed to:

/varun/peoplesoft/webserv
PRESS <ENTER> TO EXIT THE INSTALLER:
[varun@localhost PsMpPIAInstall]$
Tar Backup

Tar is  utility to Archive the data in Unix flavor Operating Systems

1 . Creating uncompressed Tar  archive

  •     This is the basic command to create a tar archive.
  •     $tar cvf file.tar file_name
  •      Extracting uncompressed tar file
  •     $tar xvf file.tar

2 . Creating a tar gzipped archive

  • Basic command to create gzipped archive
  • $tar czvf file.tar.gz file_name
  • Extracting gzipped archive
  • $tar xzvf file.tar.gz
  • to view contents of gzipped archive
  • $tar txvf file.tar.gz

3 . Creating a bzipped tar archive

  • Basic command to create bzipped tar
  • $tar cjvf file.tar.bz2 file_name
  • Extracting bzipped tar archive
  • $tar xjvf file.tar.bz2
  • to view the contents in bzipped archive
  • $tar tjvf file.tar.bz2

Size of the above tar archives     tar>tar.gz>tar.bz2

bzip2 takes more time to compress and decompress than gzip.

bzip2 archival size is less than gzip.


[varun@localhost Tuxedo10gR3_x86_64]$ ./tuxedo10gR3_64_Linux_01_x86.bin -i console
Preparing to install…
Extracting the JRE from the installer archive…
Unpacking the JRE…
Extracting the installation resources from the installer archive…
Configuring the installer for this system’s environment…

Launching installer…

Preparing CONSOLE Mode Installation…

===============================================================================
Choose Locale…
—————-

->1- English

CHOOSE LOCALE BY NUMBER:
===============================================================================
Tuxedo 10gR3                      (created with InstallAnywhere by Macrovision)
——————————————————————————-

===============================================================================
Introduction
————

InstallAnywhere will guide you through the Tuxedo 10gR3 installation.

It is strongly recommended that you quit all programs before continuing with
this installation.

Enter “next’ to proceed to the next screen. Enter “back” to modify the previous
screen.

You may cancel this installation at any time by typing “quit”.

WARNING: “Quitting” creates an incomplete  Tuxedo 10gR3 installation.You must
re-install  Tuxedo 10gR3. For more information, see “Preparing to Install the
Oracle Tuxedo System” in the  Tuxedo 10gR3 Installation Guide.

PRESS <ENTER> TO CONTINUE:

===============================================================================
Choose Install Set
——————

Please choose the Install Set to be installed by this installer.

->1- Full Install
2- Server Install
3- Full Client Install
4- Jolt Client Install
5- ATMI Client Install
6- CORBA Client Install

7- Customize…

ENTER THE NUMBER FOR THE INSTALL SET, OR PRESS <ENTER> TO ACCEPT THE DEFAULT
:

===============================================================================
Choose Oracle Home
——————

1- Create new Oracle Home
2- Use existing Oracle Home

Enter a number: 1
Specify a new Oracle Home directory: /varun/tuxedohome

===============================================================================
Choose Product Directory
————————

1- Modify Current Selection (/varun/tuxedohome/tuxedo10gR3)
2- Use Current Selection (/varun/tuxedohome/tuxedo10gR3)

Enter a number: 1
Specify Product Installation Directory: /varun/tuxedohome/
Install Samples (Y/N): Y
1- Modify Current Selection (/varun/tuxedohome)
2- Use Current Selection (/varun/tuxedohome)

Enter a number: 2
Install Samples (Y/N): Y

===============================================================================
Pre-Installation Summary
————————

Please Review the Following Before Continuing:

Product Name:
Tuxedo 10gR3

Install Folder:
/varun/tuxedohome

Link Folder:
/home/varun

Disk Space Information (for Installation Target):
Required:  195,536,693 bytes
Available: 52,005,883,904 bytes

PRESS <ENTER> TO CONTINUE:

===============================================================================
Ready To Install
—————-

InstallAnywhere is now ready to install Tuxedo 10gR3 onto your system at the
following location:

/varun/tuxedohome

PRESS <ENTER> TO INSTALL:

===============================================================================
Installing…
————-

[==================|==================|==================|==================]
[——————|——————|——————|——————]

===============================================================================
Configure tlisten Service
————————-

Password:
Verify Password:
Password Accepted! Press “Enter” to continue.

===============================================================================
SSL Installation Choice.
————————

Would you like to install SSL Support?

->1- Yes
2- No

ENTER THE NUMBER FOR YOUR CHOICE, OR PRESS <ENTER> TO ACCEPT THE DEFAULT:
: 2

===============================================================================
Installation Complete
———————

Congratulations. Tuxedo 10gR3 has been successfully installed to:

/varun/tuxedohome

PRESS <ENTER> TO EXIT THE INSTALLER:
[varun@localhost Tuxedo10gR3_x86_64]$